Nextcloud ALL IN ONE! - Server Setup Guide
Nextcloud is a wonderful platform to host your own personal cloud, work in teams, and much more. This article is going to be running over the basic installation process of the new Nextcloud All in One docker container. We are going to be doing this on Linode, but you can mimic these steps on a homelab or other local hardware. Disincluding setting up domain names and needing to charge the hostname. If you would like a $100 – 60 day credit for Linode so you can follow along with this guide just click here!
If you want to connect this to domain name and generate an SSL certificate please refer to the information in the video. Learn more about Linode DNS managment here.
Please also refer to the official documentation and the FAQ section on the official Github page before continuing. (https://github.com/nextcloud/all-in-one)
Basic Server Setup
Add a limited sudo user then exit the session. Login using ssh with the new user and update your system.
ssh root@serverip adduser brandon usermod -aG sudo brandon exit ssh brandon@serverip sudo apt update && sudo apt upgrade
Changing Hostname
Replace “localhost” in the hostname file with your domain if you have one set up.
hostname sudo nano /etc/hostname
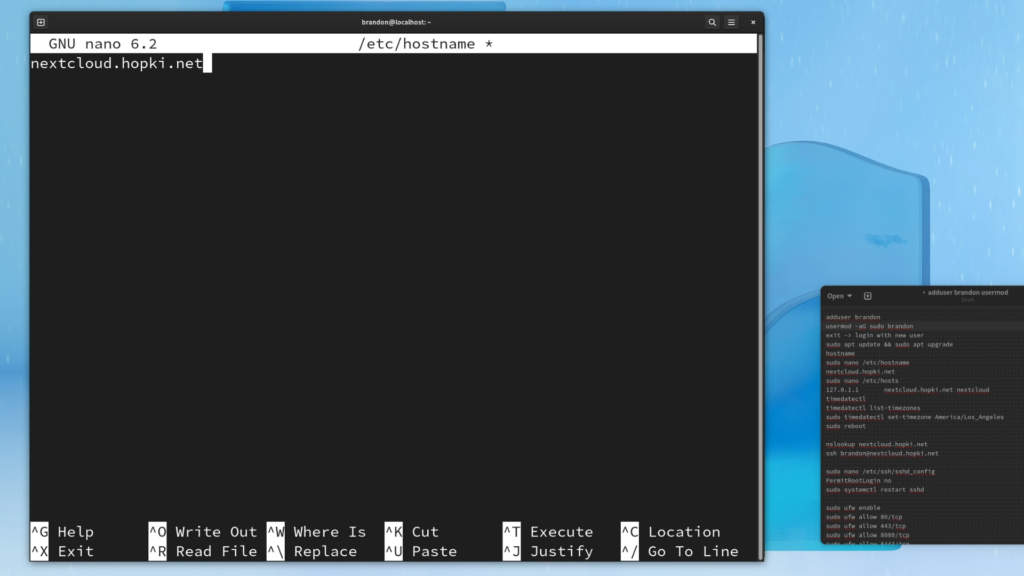
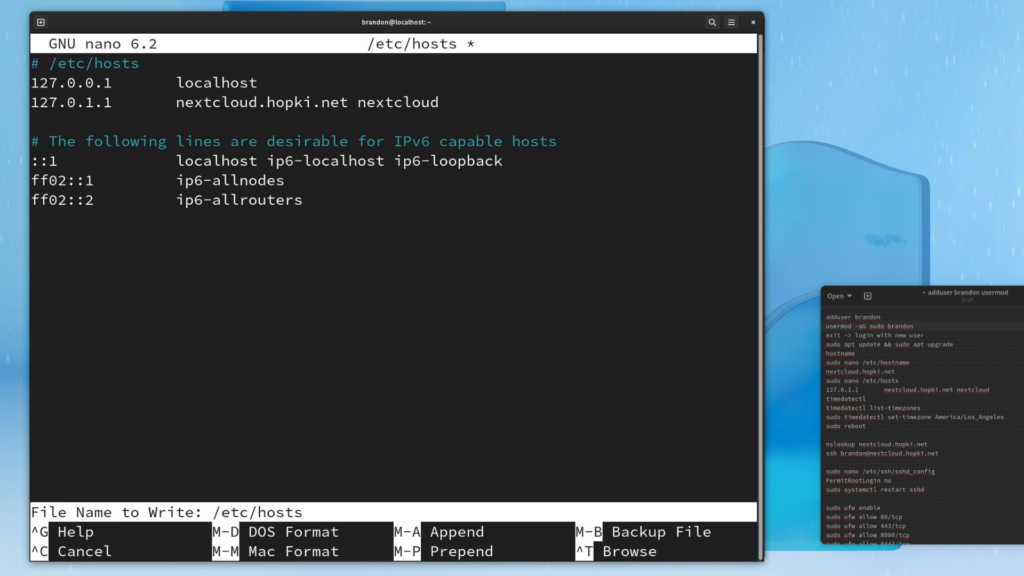
WARNING: This guide has been updated. The step adding the hosts file with the line '127.0.1.1 [TAB] your.domain short-hostname' has been removed, If your followed this guide and are looking for a fix remove the line from the file below. If this is your first setup ignore doing anything with the /etc/hosts file.
nextcloud.hopki.net sudo nano /etc/hosts
Setting Timezones
timedatectl timedatectl list-timezones
sudo timedatectl set-timezone America/Los_Angeles
sudo reboot
Check DNS Records
Type this first command to see if your domain is ready to connect to. Depending on when you linked your domain to the Linode name servers this can take anywhere from 10min to 48hr.

nslookup nextcloud.your.domain
ssh brandon@nextcloud.your.domain
Removing Root via SSH
Security measure I learned from watching LearnLinuxTV.
sudo nano /etc/ssh/sshd_config PermitRootLogin no
sudo systemctl restart sshd
Opening Ports
Please refer to the official Github for more information on what is assigned to each port.
sudo ufw enable
sudo ufw allow 80/tcp
sudo ufw allow 443/tcp
sudo ufw allow 8080/tcp
sudo ufw allow 8443/tcp
sudo ufw allow 3478
Install Docker and Run Container
First use the curl command to install docker. Then use the larger command before to deploy your instance of NextCloud AIO.
curl -fsSL get.docker.com | sudo sh bash
# For x64 CPUs:
sudo docker run -it \ --name nextcloud-aio-mastercontainer \ --restart always \ -p 80:80 \ -p 8080:8080 \ -p 8443:8443 \ --volume nextcloud_aio_mastercontainer:/mnt/docker-aio-config \ --volume /var/run/docker.sock:/var/run/docker.sock:ro \ nextcloud/all-in-one:latest
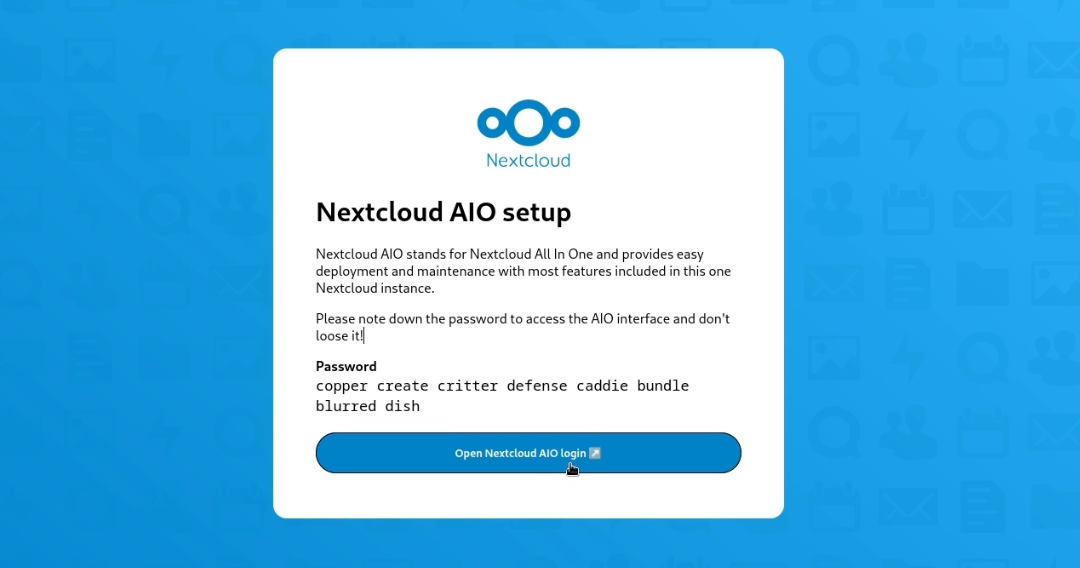
Mastercontainer Interface with self-signed certificate (works always, also if only access via IP-address is possible, e.g. https://internal.ip.address:8080/)
8443/TCP: Mastercontainer Interface with valid certificate (only works if port 80 and 8443 are open in your firewall/router and you point a domain to your server. It generates a valid certificate then automatically and access via e.g. https://nextcloud.your.domain:8443/ is possible.)

Comments ()